Pages

Wednesday 28 November 2012

Flexmarker Christmas Tags


I have a bit of a fixation for tags at the moment in my crafting, and I think it's probably because my crafty time is very limited now that the Christmas shopping is well underway. I usually use the water based AquamarkersMetallic Markers or Neon Markers to colour backgrounds on tags and cards, but I thought I'd show you a super quick and effective way to use your flexmarkers and promarkers for backgrounds.
Firstly I cut strips of Diamond White card a little larger than I required
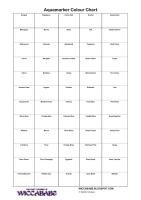
I then selected a few flexmarkers that were in the same area of the colour wheel - in this case I used Imperial Purple, Red Violet, Vermilion and Shocking Pink 
Using the broad chisel nib end, I coloured the strips horizontally, overlapping at each colour change. Now you can take your time to get a nice smooth blend between colours, or be as rough and ready as I was for a more textural effect. (I also used the brush nib to get some more defined flashes)
I then die cut the tags, but you could just as easily cut to size with a paper trimmer or scissors and a hole punch. I then chose some Christmas stamps and stamped over the tags using Archival Ink. And here are the finished tags - quick as  a flash!
Supplies List:
  • Letraset Flexmarkers
  • Diamond White cardstock from The Papeterie
  • Tim Holtz Tag & Bookplates die
  • Christmas stamps - I used ones from MME and Inkadinkado
  • Archival Ink
Debbi x

Tuesday 13 November 2012

Magical Metallics


One of Letraset's special promotions this month (November 2012) is 20% off Metallic Marker Sets,  so I thought I'd take the opportunity to go all Metallic &  Magical for my project this week. Metallic Markers are ideal for all your Christmas craft projects, and I decided to use them to make these little tags.
I created a multi-coloured background by scribbling two different metallic marker colours onto a non stick craft sheet, spritzing with water and pressing the tag onto it. I did quite a few layers until I got the effect I liked. For the pink tag I used Pink and Gold metallic markers, for the blue tag I used Blue and Silver metallic markers and for the green tag I used Green, Light Green and Gold metallic markers. I used the colour that was left on the craft sheet to also colour some white seam binding to match each of the tags.
I used the metallic markers in various colours to ink up some snowflake stamps, and stamped these onto the tags randomly.
I diecut a couple of snowmen and a small deer from chipboard and coloured these in with either Silver or Gold metallic markers, then added some glitter and attached the diecuts to the tags as shown.
And this is how my finished tags turned out. If you use a heat tool to dry the tags in between layers, then this is a nice quick project - perfect for those last minute creations.
I hope you enjoyed this tutorial - we'd love to see what you do with your Metallic Markers too. Remember to pop over to my blog for a festive marker giveaway.
Debbi x 
Supplies list:
  • plain white card and chipboard from The Papeterie, Aberdeen
  • Metallic Markers from letraset
  • Hero Arts CL622 Designer Snowflakes stamp set
  • Tim Holtz Alterations dies: Tag and Tie, Winter Wonder, Mini Reindeer & 25
  • Glamour Dust, Glossy Accents, Seam binding

Tuesday 30 October 2012

Rainbow Hair

Well, you all know how much I love funky coloured hair, so I thought I'd put together a rainbow colour combo chart with colour suggestions for each colour - and this is what I came up with...
Image used is a cropped version of Krafty Kate digital stamp from Saturated Canary.
Hope this is of some help to you - I certainly enjoyed putting it together.
Debbi x

Friday 5 October 2012

2012 Limited Edition Blending Chart

The 2012 Limited Edition Winter set of promarkers has just been released so I've managed to complete my LE Blending Chart. I've tried to choose colours that will blend with the Limited Edition colours, just to make life a little easier when you colour.

Here's what the coloured in chart will look like...
You can download your own blank chart below

Hope this is of some use
Debbi x

Tuesday 18 September 2012

Aquamarkers and Heat Embossing


Letraset have released 20 new colours in their Aquamarker range, so I thought I'd show a cool technique using 2 different stamps, some clear heat embossing and some of the new Aquamarkers

1. Firstly, I “inked up” a script background stamp with the wide nib of the Carrot aquamarker and stamped it onto a piece of watercolour paper
2. Next I inked up a silhouette stamp with Versamark embossing ink and stamped this over the script background. Then covered with clear embossing powder.
3. I then heated the embossing powder with a heat tool until it was all melted and shiny
4. I then scribbled the Dusky Plum aquamarker onto an acrylic block and used a waterbrush to pick up the colour and paint onto the image that has been left by the clear embossing. Layering up the colour to create darker areas on the flower petals.
5. I used a selection of greens plus the new Lagoon aquamarker to colour the stalks
6. Once the image is dry, I trimmed it to size, mounted it onto dark brown card, and attached it to my card base along with a greeting
Supplies List:
  • Hero Arts CG268 Thankyou Definition 
  • Hero Arts CG140 Poppy Background
  • Hero Arts CL497 Find Joy
  • Carrot, Dusky Plum, Lagoon aquamarkers
  • Versamark embossing inkpad
  • Clear embossing powder, white embossing powder
  • Watercolour paper
  • Brown and Taupe card from The Papeterie
Thanks for looking, would love to see your aquamarker projects
Debbi x

Tuesday 11 September 2012

New Aquamarker Colours

I have my sticky mitts on the brand new Aquamarker colours, and boy are they lovely! Letraset have released another 20 colours in the Aquamarker range. And you know what happens when they release new colours...... yup, I have to make up a new colour chart.

This one should be printed onto watercolour paper/card or whatever surface you normally use the Aquamarkers onto. When colouring in the chart, be careful not to touch the lines or colour names as most printers use water based ink and you'll get smudging.

You can download your own blank chart here...

Debz x

Wednesday 1 August 2012

Autumn 2012 Limited Edition Colours

Hiya,
I know a lot of you already have the Autumn LE promarkers that were released the other week, and if you don't already have yours then you are going to need them :)
I managed to squeeze in a quick half hour playing with the new colours - I was going to make up a colour chart like I did with the Spring and Summer limited edition colours. But I got a bit carried away and decided to make up a printable chart that anyone can use.
There are 2 versions, the first one has the names of the limited edition colours printed on, but all the other sections are blank so that you can put your own blending ideas down... I've coloured in what I think are blendable colours from the main promarker range, to illustrate my point.
The second version is the same as above but I've added the names of my blending suggestions
You can download both versions here..


Debz x

Wednesday 25 July 2012

Skin Tone Colour Combos


Following on from the Flexmarker hair colour combos I posted a few weeks ago, I thought I would post some of the skin colour combos that I use. I'm frequently asked at demos and classes what colours to use for various different skin tones. I've tried to illustrate a darker skin, an Asian skin, a Hispanic/Indian skin, a couple of light skin tones and I've thrown in a wild colour - the digi image I've used is Salute Her from Saturated Canary, which has a combat/army feel, so the last colour combo is a camouflage effect :)
 It's fun to play around with colours, these are just suggestions. Why don't you see if you can come up with your own colour combos
Debbi x

Monday 23 July 2012

Printable Blank Colour Charts

Hi there,
here are the two colour charts I have made up for promarkers/flexmarkers. 
The first one is for the standard promarker colours and the second one is for all the current standard  promarkers and flexmarkers together


All you need to do is click on the pics above to take you to the download site. You then download the chart(s) for free.
I recommend that you print the chart(s) onto the same cardstock that you use normally with promarkers/flexmarkers - then you can colour in your chart(s)
By using the same cardstock that you normally use for colouring, you ensure that you have a true representation of what each colour will look like. (You'd be surprised how different each colour can look on different types of cardstock)
You can also print the chart(s) onto copy paper to keep in your purse/handbag as a handy reminder of the colours you still need to collect.

Debbi x

Wednesday 11 July 2012

Personalising with Safmat


I have a wee Safmat project to share with you. Now I racked my brains for something a little bit different to show you. I’ve used Safmat for various projects in the past, and I think my favourite has to be the personalised body lotion I made up for Christmas presents for the kids’ teachers last year. Click here to see that project.
So I had a think about what else I could personalise, as a gift or for myself. Well, I’ve just had to buy a mobile phone for my 12 year old son and he had the opportunity to custom design his own phone cover online for the model I bought him. So I had a lightbulb moment and decided to personalise my own iPhone case.
So I ordered an inexpensive white plastic iPhone case from eBay – there are cases for most brands of mobile phone there. 
 
I used MS Publisher to make up an A4 sheet of designs that I wanted to print onto the Safmat, but you can use MS Word or any graphics program.
If you don’t want to print off a whole A4 sheet, you can always cut it in half to make 2 x A5 sheets – but remember to change your printer setup to reflect that.
I have a few projects planned over the next wee while, so here’s the sheet I printed off . A quick tip… if you’re not sure which side of the Safmat to print onto, just fold over one of the corners so that the film lifts away from the backing and you’ll be able to tell which is which. 
Carefully cut out the design you want to use – I used some clipart for my design and added my own sentiment in a fancy font
You can cut a lot closer to the design but be careful when removing the backing if your design is quite intricately cut, as it’s quite easy to rip.
And all you have to do is remove the backing sheet and stick it onto the phone case, making sure you remove any air bubbles as you go.
You can create your own designs with digital crafting cd-roms and downloads too – you’re only restricted by your imagination

Wednesday 27 June 2012

Flexmarker Hair Combos


I’m always asked at demonstrations “what colours do you use for blonde/brown/red hair?
But because I’m always experimenting with colours, the answers are usually different all the time. Now that we have Flexmarkers, we have even more colours to experiment with! So I’ve spent this afternoon trying out some new hair colour combinations. I’ve selected colours for a brunette, a blonde, and a redhead as well as 3 wilder colour combinations.
flex hair
By using flicky strokes – yes that is the technical term – you can achieve a more realistic, textured effect to the hair, so you don’t need to worry about blending the shades too much.
I used the “Double Take” digital image from Saturated Canary for my sample chart, printed onto Diamond White card from The Papeterie
 I hope these colour combos inspire you to experiment with your FlexMarkers and ProMarkers, we’d love to see how you get on in the comments!
Debbi x

Flexmarkers - Skin & Fair Hair

Hiya
Another quick video tutorial, this time featuring the new Flexmarkers


Materials List
Flexmarkers: Rose Peach, Sunkissed Pink, Blush, Nutmeg, Light Fawn & Buttercup
Diamond White cardstock from The Papeterie
Seasons Greetings - Sassy Stamp from Sugar Nellie

Ultra Fine Nibs/Promarkers - Skin & Boys Hair

Hi there, I've done a quick video tutorial showing colouring skin and boys hair with Promarkers and the ultra-fine nibs available separately.
Materials List:
Promarkers: Burnt Orange, Coral, Sunkissed Pink, Blush, Walnut, Cocoa, Cinnamon, Tan & Almond
Ultra Fine Nibs
Diamond White cardstock from The Papeterie
No. 1 Fan - Simply Sassy Stamp from Sugar Nellie

Wednesday 13 June 2012

Aquamarker Tags


As much as I love my Promarkers and Flexmarkers - there are some things that they just can’t do – and this is where the Aquamarkers come in ready to try out a whole host of different crafting techniques.
I decided not to use the Aquamarkers for traditional water-colouring, I thought I’d try to show a few quick and easy techniques that you can use on cards, tags, altered art projects etc.


Materials List:
  • Letraset Aquamarkers: Mediterranean, Sunburst Yellow, Fern Green, Flame Red, Gold Ochre, Mahogany, Puce, Cranberry, Royal Purple, Storm Blue
  • Letraset Metallic Marker: Silver
  • Embossing Ink pad and Clear embossing powder
  • Tim Holtz “Attic Treasures” stamp set
  • Tim Holtz “Mini Papers Rosettes” die
  • white card
  • seam binding
  • buttons and rose cabouchon, foam adhesive letters
stamped tag
I stamped my background stamp with embossing ink onto a plain white tag, then covered with clear embossing powder

embossed tag
I then used a heat tool to melt the embossing powder so that it appears glossy…

scribble
Next up, I took 2 Aquamarkers - Mediterranean and Sunburst Yellow - and scribbled with the large nib onto a non-stick craft sheet. I also added a wee bit of Silver Metallic Marker.

spritz
Then I spritzed the colour with water to make it a bit more dilute and fluid.

swirled
I placed the tag face down onto the colour and swished it around to make sure the whole tag was coloured, which also further blends the colours. You can also just press the tag down onto the colour and lift it straight up for a different effect. I used a heat tool to dry the tag, but you can also just leave it to dry naturally.

dark
As you can see, the embossed areas resist the colour, so it remains white. Next I used a Fern Green Aquamarker to ink up the same background stamp and stamped directly onto the tag, overlapping the embossed area.

binding
I wanted all my trims and embellishments to match the colours I used on the tag, so I scribbled some more of the Mediterranean and Sunburst Yellow Aquamarkers onto the non-stick craft sheet, spritzed it with water, then swirled around some seam binding and dried it with a heat tool.

ruffle
I attached a strip of double-sided tape near the bottom of the tag and stuck a length of the seam binding to it, ruffling it as I went. Then, I used the remainder of the seam binding to tie onto the the top of the tag.

dad
I die cut some rosette strips from white card, coloured these in the same way I coloured the tag and then attached them to the tag with a button. And as Fathers Day is coming up this weekend I added the word DAD in foam adhesive letters

detail1detail2detail3detail4
Here are some close-ups of the details.

3tags
I made another couple of tags using the same techniques but different colours
I hope you’ve been inspired to have a go at these easy techniques – we’d love to see how you get on

Friday 1 June 2012

LE Summer 2012 Colours


So I got some new Gorjuss Girls stamps for a demo I’m doing soon, and when I saw this one, “Awashed”, I knew it was just crying out to be coloured in the gorgeous (pardon the pun) ProMarker Summer Limited Edition colours.
Awashed Card - Summer Limited Edition Colours I’ve used Island Lagoon on her tail (with Marine for shading), Pink Lobster for her hair (with Rose Pink for the paler shade), and both Tequila Sunrise and Summer Sun for the shell she’s holding.
To give more texture to her scaly tail, I used the Blender by just touching the nib onto the coloured area randomly like in this close-up…
 close up of blender on tail
I also used the Island Lagoon to colour the fancy cut border and to edge the card. Colouring trims and embellishments with your Promarkers are a great way of ensuring everything colour-matches perfectly.
Supplies used:
  • ProMarker Limited Edition Summer 2012 6 Set
  • Letraset Promarkers: Marine, Rose Pink, Coral, Sunkissed Pink, Blush
  • Gorjuss Girls stamp “Awashed”
  • Diamond White  and plain white card from The Papeterie
  • Hero Arts stamp set CL383 Antique Engravings
  • Memento Dewdrop inkpads in Summer Sky, Pear Tart and Lulu Lavender
  •  Spellbinders Shapeabilities Ironwork Accents
  • Sizzix Textured Impressions embossing folder Lines & Circles

Summer 2012 Limited Edition Colours

 Just like I did with the Spring colours, I've put together a wee chart to show where these Limited Edition colours fit in with your existing promarkers...

If you want to see the equivalent Spring chart, you can find it here.
Now, I need to get cracking with a lovely summery project to show them off :)
Debbi x

Wednesday 16 May 2012

Metallic Marker Tag


Today I’ll be sharing a project that I put together using the new Metallic Markers. At the moment I think I have to say that the Metallic Black from Metallic Marker Set 2 is my favourite :) .
mm tag1

To make this tag,
 I coloured a kraft tag with Distress Inks in Wild Honey and Fired Brick. I then used theCopper Metallic Marker from Set 2 to ink up the “Watch Gear” cling stamp from Hero Arts, which I stamped randomly over the tag.
(Tip: because the metallic markers are water based, if they dry on the stamp you can “reactivate” the ink by breathing on it!)
I stamped a Tim Holtz greeting with Archival Ink at one side of the tag, over the top of the metallic stamped pattern.
mm tag2


I die cut some Tim Holtz “Mini Gears” from chipboard and kraft card and coloured these and a washer withBlackCopper and Silver Metallic Markers from Set 2 then stuck them to the tag with Glossy Accents.
mm tag3

To finish off the tag, I scribbled the Black Metallic Marker onto a non-stick craft sheet, spritzed with some water and then used this to colour some seam-binding. I coloured two more pieces of seem binding in the same way with the Silver and Copper Metallic Markers, then tied the 3 pieces of seam-binding to the tag.
mm tag4


I hope you liked my project! I’d love to see what you do with these gorgeous new Metallic Markers.
Debbi x